What is Educational Technology?

This week’s discussion around educational technology opened my eyes to what it used to look like and the overall definition of what educational technology is. I grew up in the digital age of the internet, computer labs, All The Right Type classes, and using computers as a form of research instead of relying solely on the books in the library. With that, it is tricky for me to think that educational technology can be much more than that. When thinking about our discussions and conversations we had in the class, we discussed how the evolution of the chalkboard and pen and paper work was a form of educational technology. The idea that textbooks and different ways to gather knowledge was also an evolution of how education was viewed. Tony Bates in his chapter “A short history of educational technology” dated all the way back to oral communication being the first form of teaching and learning. The idea that storytelling was the way information was shared and learned, and the learners needed to rely on memorization skills and their own oral communication to then continue passing this information along. As we all know education has changed largely from this form of teaching and learning, and every little new advancement that came after oral communication could in turn be considered “educational technology.” With that, when I try to put educational technology into a definition, one could look at it as a series of advancements that change and support teaching and learning. That is a quite broad definition, but educational technology in itself is quite broad.  

Now to reflect back to my own view of educational technology in the modern day, I really see the idea of technology having a large role when computers began to be used more and more for teaching. I specifically remember in school around grade 9 being introduced to research on the computers and typing up our first essays. Then moving up in the grades, seeing the use of Smartboards, and doing classes online through video recorded options with a camera pointing at the teacher while he taught the students in his class. Looking back on it, even these technology sources could be seen as quite outdated compared to what we have available to us now. In a previous ed tech class I have taken we looked at the SAMR model of educational technology, this model breaks down the ways a teacher uses technology within their practice. When I was in school a lot of the ways we used educational technology was in the stages of substitution or augmentation. It did not make a huge difference whether we typed our essay or wrote our essay using pen and paper, but we just replaced it. Or instead of using the textbooks, teachers may have pulled up a PDF version that we looked at all together. This refers closely to Clark’s arguments in stating that no matter what form of medium you use, it will not impact student learning. However, as technology continues to advance and the use of online learning environments and social media come into play, we begin seeing the idea that can modify or redefine the way we teach, learn, and complete tasks. When comparing how I used technology as a student, and now as a teacher the format of my classroom looks much different. The use of platforms such as Google Classroom, YouTube, Interactive learning games, etc. has allowed me to engage my students in ways that reflect their own interests and what is meaningful to them. With the availability of Chromebooks and iPads for the students to use, we are able to provide differentiation and support in ways that were never available to teachers in the past. The simple ideas like speech to text have dramatically changed the success my students can reach. 

In Neil Postman’s article “Five things we need to know about technological change, ” he provided some interesting points about the evolution of technology. At one point he discussed technology as being mythical, students having the understanding that technology is just here because they have always been surrounded by it. I found this idea very interesting in this day and age because the students we teach have never been without these high end forms of technology. They have grown up from infants watching television, playing with iPads and video games. To them, technology is just part of their world, part of their culture. However, when thinking about technology Postman made a good point in stating that “culture always pays a price with technology.” Throughout history, with every evolution of technology, we have seen a shift in our culture and way of life. The use of the printing press made information more accessible and in turn changed how education could be taught. Looking now, after teaching younger students, the evolution of tablets has changed the experiences young students have when it comes to coloring, using scissors and their fine motor skills. Postman stated “technology giveth and technology taketh away” with every new advantage technology gives, disadvantages may arise. I think that is a key piece for educators to understand when implementing technology into our classrooms is to think, what is the purpose of this form of technology? How will it enhance my students’ learning? Will this benefit or harm my students in some way? Growing up with educational technology at my fingertips, I easily can turn and only see the positive side and the doors these tools open up to us, however, now teaching grade 7, I find I am more aware of the harms these tools can also bring if not used correctly. So, as we move forward in this class it is crucial I continue to keep these questions in the back of my head to ensure I am using technology in a positive and not a negative way.
Summing up our learning!

Hello everyone! Stacey and I are excited to share with you our Summary of Learning in this course. We have created this as a short little PD opportunity for our staff and hope you enjoy it as well! Thank you all for the wonderful course and I look forward to seeing you again in classes to come.

Online Course Overview and Next Steps!

Stacey and I created a course on Increasing Patterns designed for Grade 2. We imagined this course to be something that we could use in our own classrooms. The modules we made are intended to be supplemental to what is being taught in class. 

If you are looking for a walkthrough of our course and all of the components please click this link here. In this video we will quickly take you through the course, for a more in depth look at the created modules, there will be links to videos in this blog post that you can watch as well! Enjoy, we are looking forward to hearing any feedback you have! 

Course Profile: 

As our school is based in-person, the majority of the lesson/teaching portion will take place in the classroom while the modules are designed to provide students with a quick review and then give them opportunities to practice the concepts we are working on. For a complete description of our course, please see the course profile we created! We found the process of completing the course profile quite humbling as it allowed us to critically think about different factors and considerations we need to consider when designing courses for our young students. For example, throughout the creation of our course profile we were able to think about the “what if” scenarios, for example; what if we have a child enter our classroom with a visual impairment – how would this impact our current teaching and what changes would we need to do to accommodate these students! Overall, the course profile was a great organization tool that took us back to the basics and allowed us to plan our next steps. Sometimes in the hustle and bustle of teaching we forget how crucial this planning stage is to the success of lessons and accomplishments of our students. 

LMS Tool: Google Classroom:

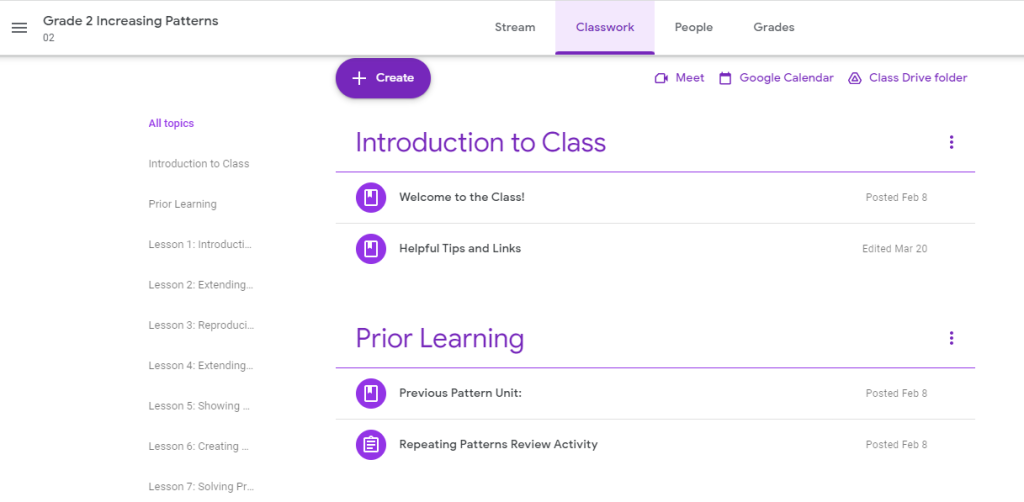
After reading  Bates 4.2 “Old wine in a new bottle: classroom type learning” we knew it was time to start looking at a LMS to begin building this course. Understanding that online learning can be much more than just recorded videos and following the “flipped” classroom model, we decided to explore Google Classroom further as our LMS template. We decided to follow this route as it is the programming that our school division has access to, making it easy to share and get the students connected to the platform (which is essential with the young grades). We also really enjoyed certain features of Google classroom, especially that the one classroom is a one stop shop for the content, Google Meet link, assignments, videos, and a place to ask questions. We both had experience using Google Classroom we took this opportunity to further understand all of the different options the platform has to offer! 

This is what our Classroom looks like!

Module Development: 

What a rewarding experience it was to create these modules. With Stacey and I both being new teachers, oftentimes we are just trying to keep up and get through the learning outcomes that we forget to stop, take a break and find different ways to teach the content. In our first few years of teaching we have found it very easy to settle into “the way it has always been done” mindset, and forget how different teaching could really look. With that, through the creation of these different modules we were able to step out of our comfort zone and create different ways of teaching and learning that we would not normally do in the classroom. With that being said, we both agree there is a time and place for technology to be utilized however using technology as a supplementary tool in the classroom created amazing learning opportunities for the students while beginning to grow digital citizenship and awareness at a young age! In the next part of this blog post we are going to break down the four modules that we fully completed, at this time you will be able to follow links to past blog posts and videos to see the course come to life. You will notice that all of our modules follow the same format to keep routine simplistic and easy to follow for our students and their families. 

Lesson 2 Module:

The first module that was created for our course was for the second lesson in our unit outline. The module was based around extending increasing number patterns. Students had a review video to watch about hundred charts, a video to watch where I explained how to complete the lesson and went through the assessment rubric, and then an assignment where students extended number patterns on a 100 chart. For the 100 chart activity, I created a template on Google Draw. This was the first time I made something with Draw and it was very easy to use and would be easy for students to navigate as well. The only thing I didn’t like was that you can only make one page for the drawing. This made it so that it is very zoomed out when students first open the assignment but I just showed them in the video instructions how to zoom in and I don’t think it would overall be an issue. I chose to use draw instead of slides because then I could assign an individual template to each student. I wish that I had watched Michael Wesch’s videos (What Teachers can learn from YouTubers about Engaging Students Online and Make Super Simple Videos for Teaching Online) before making the videos for our first modules. Wesch’s videos helped me to realize that making videos for teaching does not have to be a perfect “performance.” What matters is connecting with students and being real. Having this mindset before creating my first video definitely would have saved me from several takes and  redo’s. 

Lesson 4 Module:

When creating module 4 it was hard to know where to start. We had experience creating online learning opportunities for older students as well as providing students with log in accounts to  different platforms such as Epic, Mathletics, and Prodigy, but we never created activities on our own to be completed. With that, the first two modules we created took a lot of brainstorming and testing to ensure we were using our LMS platform correctly to make everything accessible for all students. In Lesson 4 students had the opportunity to extend non-numerical increasing patterns. As mentioned above this module followed the same format: students completed a lesson in person, then there was a walk through video of the assignment that the students watched, followed by them completing a short activity on their own. For this activity, I used JamBoard which was a new platform for myself. It reminded me a lot like google slides however, was a little easier to navigate and work with moving pictures and objects where you wanted.  This module also had a rubric provided for the students along with a short review video in case students were away. After reflecting on the accessibility component that we discussed in class, I now wonder if the drag and drop activity is as open-ended as it should be for an online course. For some students, this task could be very tricky and moving forward it is important I look into ensuring that all students would be able to complete this before assigning it. 

Lesson 3 Module:

After receiving feedback from our peers, we made our second modules similar to the first ones because we received a lot of positive feedback. The module for Lesson 3 is about reproducing numerical increasing patterns in a non-numerical format. Keeping with a format similar to the first module, this module has a video lesson/explanation, a rubric, and then a practice activity where students show an increasing number pattern in the form of their choice. In the video I created for students, I went through an example Padlet that I made which demonstrated what students could do on their own but with a different pattern. I had used Padlet before as a student but never as a teacher. It was very easy to create a Padlet and customize it as I liked. It was also easy to copy the link to the Padlet and share it into the Google Classroom. This is a tool that I will use again in the future. Creating the video part of this lesson was way less stressful because the embedded webcam tile was not in this video which made talking feel more natural. This module was fun to make because I imagined the students in my own classroom and what kinds of things they would like to do to show their learning!

Lesson 6 Module:

The last module we created was for lesson 6 of the unit. This was a really fun activity to create as we knew the students would love having the opportunity to record themselves creating a pattern in their home. This lesson we tried to keep very open-ended to allow the students to take the learning where they wanted, and we also used a padlet for posting like we did in lesson 3 as it allows for students to have connections and learn from one another while completing online work. This was one of my goals in my blog post where I discussed trying to make a community in the online classroom. By using the padlet, the students were able to not only easily post their own videos, but also comment and learn from their peers’ videos as well! Again, this module followed the same format with a walkthrough video describing the lesson, and then an activity for them to complete! For an example of the assignment the students will be creating, please watch my modeled video here. To ensure the families knew the expectations a rubric was also provided. I would be very interested in having our students complete this activity to see at this age they would be able to complete a simple video on their own! 

Thoughts for moving forward in our teaching careers: 

Overall, this assignment allowed us to explore the many options we have to begin incorporating tech into our classroom. As mentioned at the start of the course, we both had experience using tech in the classroom, but that did not extend further than providing the students with opportunity to use different apps such as Epic and Mathletics. Through creating this course we have learned the many different ways we can use tech to enhance our teaching and not just supplement our teaching. We loved how accessible the online learning environment made it for our students this year where attendance is not always routine. Moving forward, we hope to use this course in our grade 2 math classrooms and also continue the learning by providing the students with other online created activities. Moving forward into our careers, we understand how essential it is to provide quality instruction to our students, and with how our society is, that quality instruction also needs to include opportunities for students to develop a positive and safe digital identity as mentioned by Bates in Chapter 13.1 of their book. The answer is no longer do we have to use technology? But rather, how do we provide lessons that embrace and support the digital age our students are growing up in? There is no debate that technology needs to be incorporated into our teaching, because the reality is technology is not going away, it is our responsibility to support our students in creating a safe online presence. 

Communication and Collaboration is Key!

After reading Bates 4.4, I began thinking about the course Stacey and I am developing, and I was left a little worried. When looking at our course, we have different places set up that allow for communication between teacher and student. For example, students have the opportunity to ask questions on our google classroom forum posts, as well as logging onto the google meet at specific times through the week to ask questions. However, as Bates outlined, these ideas are good for students and parents to clarify and ask questions, however, it does not open much for collaboration and communication between student and student. So, what now?

When starting to think about how I can incorporate an OCL in the course I am creating I was left a little loss. I met many roadblocks in my brainstorming for a few reasons but most importantly the age of my students. These students are in grade 2, with that, I am not sure the extent these young students would be able to participate in an OCL. As mentioned by Bates, “students come to the educational experience with different expectations and backgrounds.” Furthermore, in the context of my course, the parents/guardians also come into these courses with different educational backgrounds. So how do I create collaborative learning experiences that all can participate?

After reading the other two articles: “Applying the 6 Strategies for Building Community in Online Courses” as well as “The Importance of Community-Building” I was able to further grasp what I already have in place to create a collaborative learning environment for my students as well what I can change and create moving forward to provide more interactive learning opportunities.

Things I have in place to provide an OCL Environment:

  • Create a plan for communication: In the course profile, and on our google classroom Stacey and I have outlined that we will be available to meet at Google Meets from 3:00 – 3:30 on weekdays where they are able to ask questions and clarify assignments. Students also have access to make an announcement on the Google Classroom which is broadcasted to all the classes to be answered. These options were communicated when the course was first opened!
  • Meet in Real-Time: Again, students and families are able to meet us in real-time on the Google Meet, as well, most of our students are joining us for in-person learning as this is a blended course!
  • Consider flexible options for online participation: we are doing this by providing short videos instead of long synchronous videos that are needed to be watched.

Things I want to create to provide and OCL Environment:

  • Create opportunities for information and expertise sharing: This step, was one I found complicated when working with young students. As our course has been created to support in-person learning luckily the students know each other and are able to communicate in person. One aspect that I hope to create moving forward is an activity where students are able to share their learning with items that they are interested in at their homes. For example, this may be them, creating a video about making an increasing pattern with Lego and sharing this to our course page or through Seesaw! This way students are able to share work that represents them and their interests and also share in the teaching and learning among peers. After watching Wesch videos, I have seen how valuable sharing through videos can be and how simple they can be created. When creating this activity, I will model making a simple video with my increasing pattern and then ask the students to respond to my video with their own increasing pattern video! This will be a way to communicate in a different way with the students. From there, I will use either a Padlet or Flipgrid link that will allow all students to see their peers video. As Bates outlined, this form of collaborative learning “can lead to deep, academic learning, or transformative learning.”
Here is just one example of a simple video done by a Grade 1 Student!

Connection to Assessment:

Thinking about assessment in the younger grades it looks a lot different then in high school and adult education. Assessment is not just giving summative tests, but rather gaging their understanding based off of constant observations and conversations that are ongoing in the classroom. Anecdotal notes in the younger grades are a teacher’s best friend and small learning activities where you can take a quick picture of the students learning is essential. But how can I do these forms of assessment work in an online course. Luckily, many tech experts have created numerous apps and tech tools that allow for the easy showcasing of knowledge. For example, Seesaw is a student friendly app where they can complete activities and easily share videos on their accounts. When assessing participation in a blended course, you luckily have the opportunity to assess both the in-person conversations, but also the conversations created through online engagements. For example, when the students create their short videos and share their learning with others. However, I am interested to see how other reflect on the assessment piece when it comes to participation online as it is something I struggle with in the elementary grades! Let me know your thoughts!

Covering all our bases…

Stacey Mamer and myself have been building our grade two course together, with that we decided to review the feedback and make our plan moving forward together. Please read our blog post below!

The feedback that we received from our peers on our course was overall very positive. Our peers seemed to find our course easy to follow and well organized. This was helpful feedback because it assured us that our course was easy to follow for other people. Sometimes when we are creating lessons as teachers, it makes sense in our own heads and the way that we would do things in our own classrooms but it may not be as easy for others to follow. This feedback from our peers assured us that we were on the right track. Moving forward, we will continue to follow the same format as our previous modules to maintain consistency within our course. We will continue to provide both the step by step instructions and videos to ensure that our students have an overall understanding of the expectations for each lesson. One thing that could have been improved in our modules was accessibility to our peer reviewers. Our Google classroom code did not work for emails outside of our school division. We did provide a video walk through of our module and course, but moving forward, we will provide a more detailed one to help combat this issue. 

Our class discussion about accessibility along with this week’s readings helped us to reflect on the accessibility of the course we are designing. Chapter 9.2 in the Bates text, tells us that there are many key components we must recognize when using different sources of technology in our teaching. It is important that we know the needs of our students so that we can make learning accessible to them. When we created our modules, we were imagining that it would be used with the current Grade 2’s at our school but we could incorporate different methods that would help make the course even more accessible to students. To be inclusive of learners with disabilities such as deafness, hard of hearing, and visual impairment, we will provide written instructions, video instructions with subtitles. If we had an EAL learner in our classroom, we could provide subtitles in their first language. When thinking about our activities that we have created, one of our reviewers mentioned how these two activities (the drag and drop activity and the 100s chart activity) would be used if a child had a visual impairment. This is something we both did not think about but something that needs to be addressed. To create a more accessible online learning environment we could provide different activities using tools such as speech to text. We are curious if any of you know of other online tools that could be utilized for students with visual impairments? 

Toy’s article on technological equity and accessibility helped us think of ideas that would help support our course design. Our course as it is, would be tough to complete without internet access. Moving forward, we will try to incorporate ways that students can access learning without the internet if it is needed such as printable hard copies. Google classroom can be accessed on computers, chromebooks, and IOS and Android devices but the app is not available for Windows devices. It is important to know what devices our learners will be accessing the course on because if they only have access to a windows device, a different accommodation will have to be put in place for them. This article also gave us things to keep in mind as we build our course such as keeping due dates flexible, and being consistent with one method of communication.

As we continue to build our course, we will keep what we have learned about accessibility in mind. We will continue to provide instructions as we have in both written and video formats. One thing that we are going to do differently for the next modules is try to incorporate different ways that learning can be demonstrated. We will give students choices as to how they wish to show what they have learned such as making a video, or a recording instead of just one product based assignment. We really appreciate the feedback that we have received from our peers, thus far and welcome more in the future as we continue to build our course!

Course Platform: Module One!

Hello everyone! What a busy week it has been beginning to create the first module for Stacey and my course platform for Grade 2 math! We decided to go with Google Classroom to create our platform that is something we have available to us at our division. With that, we have created this short video to take you through our platform!

Stacey and I divided up our modules, check out Stacey’s blog here! For my module I decided to create lesson 4. As you can see in the video, our lessons are broken up into the lesson description, video to review content, then the activity that the students are to create! This module was a lot of fun to create as it allowed me to explore some different tools such as Jam Board outside of the university context. Check out my “how to” video here that the students would watch to show you what the lesson looks like!

I am excited to continue growing this platform and I look forward to any feedback you all may have!

To Interland and Beyond!

When I saw this blog entry, for the week, I thought what a perfect opportunity to do some research to support a problem some of the teachers were facing in our school. Something I am sure we all have experienced throughout teaching in this digital age is supporting our students to learn and understand how to create a positive digital identity. It is one of those teaching moments, that is not outlined in our “formal” curriculum, however, is crucial to supporting our students in creating an overall positive sense of self. With cyber bullying being on a rise, it is crucial our students know how to navigate and use the online world in a practical way. That is why for this week’s assignment I started looking for an online tool to support teaching students about digital literacy. It didn’t take long until I came across a Google created platform called “Interland” an online game that teaches individuals how to safely navigate the online world.

Interland was created by Google to help “kids be safe, confident explorers of the online world.” Watch the introduction video here to see the possibilities this resource has to offer!

Components of Interland:

Interland is made up of four different “islands.” On each island, students are able to explore certain topics related to digital literacy. The islands are:

  • Share with Care: This teaches students how to share online, specifically looking at how to share with those they know, and to stay clear of people they do not know!
  • Don’t Fall for Fake: This island has students explore the reality that lots of what we find on the internet is fake and it is our jobs as digital users to navigate through what is fake and what is true. The different questions, provide students with tips to know what is true or false!
  • Secure your secrets: On this island, students work through the game questions and learn how to secure their personal information. For example, how to create strong passwords and switching up passwords every so often.
  • It’s Cool to Be Kind: This island has students go through different questions and activities to teach them about kindness online. How we can spread kindness or not through our online presence.

How to use Interland:

Interland has a couple of different ways that the learning can happen. First, the students have the opportunity to explore the world at their own pace and navigate through the questions on their own. Or teachers can decide to download the “Be Internet Awesome Curriculum” that provides teachers with lesson plans and whole class activities to teach about these different topics. After looking over the resource, I would say it depends on the age an awareness of your students to decide what path to take. If you have the students go right to Interland they will go through the islands and take facts to hopefully apply to their own lives. I would say this independent learning would be for older grades (9-12). If you are bringing awareness to digital safety with younger grades (4-9) I would suggest using the lessons that have been outlined. The teacher would go through the series of lessons for each topic, and then it is not until the end that the students would then go and work through the island! By using the lessons, students would gain a more thorough understanding around digital literacy. It would all depend on the time and relevance this would have in your classroom.

Exploring one of the islands!

Teacher Curriculum and Resource:

In my opinion Google has done an amazing job in creating this platform to support teachers and students. In the teacher resource, they have created lesson plans with activities to do with the class for each lesson and they have created Google slides for each lesson to support your teaching.

Advantages and Disadvantages of Interland:

I will be honest; I am a huge fan of Google platforms. I used Google all throughout my undergrad, my certificate studies, and now in my classroom teaching. I find their platforms are very easy to navigate and are user friendly to the students I teach and their families. With that, when I saw another Google platform, of course I needed to take a look into it.

Advantages:

  • No prep for teachers – whether you have students work on it at their own pace, or teach from the lessons everything is ready to go for you
  • User friendly – Students could simply scan a QR code or type in the Interland and it would take them right in the world.
  • Interactive – Students have the opportunity to learn about digital literacy in an interactive game mode.
  • Free – Both the game platform and teacher resources are free to use for everyone.
  • Easy read – This platform has been created for students. With that, the language suites their understanding.
  • Relative: The examples and scenarios the game provides are very relative to what the students are probably facing with their own online identity.
  • You continue answering the questions until you get them right.
  • You can the different islands as a class on the smartboard or individually using a tablet or Chromebook.

Disadvantages:

  • The questions are not all read to you and I was unable to figure how to get them to read to you. This could be difficult for students who are slower readers.
  • While playing the game sometimes it was difficult for me to figure out what they wanted me to do. With that, some younger learners may require more support.
  • You do have the option to skip through the learning descriptions at the beginning of each island, this has meaningful information that you wouldn’t want the students to miss.
  • Time: The lessons can be lengthy and getting through the different islands might take the students some time, with a full schedule already this unit may have to be spread out through the year adding lessons here and there!

Overall, I am really excited to see this interactive resource to support digital literacy as it is a prevalent issue that many students will face in their lives. I hope to start using this in some of my classes to support students in creating a positive digital literacy!

Check out Interland and let me know what you think, I look forward to hearing from some of you.

Are you sure this is Blended Learning?

As I write this blog post I reflect on the days of grade 5 and up where our technology in the classroom consisted of walking down to the computer lab once a week to work on our typing skills on All the Right Type, and once you passed your level moving onto CoolMathGamesforKids which we all knew had nothing to do with math! Now, after last week’s class, according to the continuum of technology-based learning, this once-a-week class essentially was a form of blended learning as these different tools we used would be considered classroom aids!

Throughout my schooling, the way we used technology continued to shift from using those different apps, to learning how to use Word and type our essays, all the way to Grade 12 where I completed my Calculus 30 through a live stream lecture class. This class was essentially online because I was the only student from my small school taking the course, so instead of having a teacher from our school teach it, I zoomed into a neighboring school. As outlined in Chapter 4, this live streamed video would have been the first step to online learning. Now don’t get me wrong, in high school this seemed like some pretty advanced stuff! I thought how cool it was that I could just log into a different classroom instead of driving to the town. Flash forward to now, after a couple of years of Covid, technology advancements, and the digital age booming; this form of live streamed video lectures still occur, however, new approaches are producing better results!

Now moving into my career, I have used different learning tools such as Google Classroom, Read Theory, EPIC, Mathletics, Prodigy, Edsby, and SeeSaw to support my teaching and the learning of my students. I mainly use these different platforms during times such as Daily 5, and math rotations as it supported me in teaching small groups and ensuring the other students were doing something productive. Luckily, students gravitate to technology so getting them interested in these different apps during independent work time produced a learning environment that was quiet and classroom management was minimum. Using these different programs in the classroom were very helpful when it came to differentiation! Having these tools set up, it was easy to ask students to grab a classroom iPad to go and work on one of the apps while waiting for the rest of the students to catch up, or have an EA support a student at a lower level through these ready to go lessons. However, I found using these apps it was hard to keep up with seeing what the student could actually do. Lots of these apps are multiple choice answers, and at the end of the day students could randomly choose an answer and get it right, resulting in them doing well on the online quiz and not so well when they came to the small group. Another benefit of these different apps was that they could all be accessed at home, when students needed extra practice instead of sending home print outs and booklets a message could be sent to parents and the student could work on the assignments online! Overall, I really liked having these apps available to my students in the classroom, but I never used them as a main teaching tool, but as an extra practice tool when needed. Reflecting back to the continuum of technology-based learning, these different tools I introduced into the classroom were merely classroom aids. These tools were used to support the students practice the skills that were already taught in the classroom. For example, I would use Prodigy (math app) to have the students practice their multiplication skills I taught the lesson in person. Not saying that this form of technology in the classroom is not valid, but as chapter 4.2 suggests, I merely was replacing a practice worksheet for a practice game on the iPad.

So, what does this mean moving forward in this class? The hopes as I continue my teaching career is to find ways to use technology as a learning enhancer rather then just a replacer. As stated in chapter 4.7, the “Agile” Design is the strategy that can be used to start bringing technology into the classroom as a meaningful enhancer to student learning. Understanding that the Agile Design is embedding learning with real world scenarios, the learners have the opportunity to gain the skills needed to be successful in the digital age. The question is, in an elementary classroom what would this agile approach to blended learning look like?

Hello Everyone!

Hello everyone, I am Sydney McGrath and this is my first class of my TLL program! This is my second year teaching and I teach Pre-Kindergarten in the mornings and am a release teacher in the afternoon. I have really enjoyed being a part-time release teacher as I get to work with a variety of the classes in the school from Kindergarten all the way up to Grade 6! This past year I have completed my Certificate of Extended Studies in Inclusive Education here at the univeristy and I enjoyed those classes I wanted to continue on with my education and growing as an Educator! I have really enjoyed these classes being offered online as they have allowed me to work close to all of my family while still taking courses with the University of Regina! I look forward to working with you all this semester and I am sure our path’s will continue to cross throughout our programs!

Throughout my undergrad I had the opportunity to take some Edtech classes with Katia and they provided me with such valuable knowledge about how to bring technology into the classrooms. These classes not only supported me throughout my degree as I learned how to lesson plan and unit plan, but also helped me get through my internship and first two years of teaching. I completed my internship the fall of 2020, which was during the meat and potatoes of the Covid-19 pandemic. I was working in a grade 1 classroom and we jumped from online learning, to in-person learning a couple times throughout those 4 months. With that, I had to learn different programs such as SeeSaw and Google Classroom very quickly to be able to connect and work with the students. Moving forward a year from my internship I was covering a maternity leave at a school in Humboldt and my grade 5 class was put online for two weeks due to the pandemic. This was a very daunting and time consuming task as a new teacher, especially since it was my first contract alone, however, with the ease of Google Classroom I made it through! During these two weeks I really focused on using tools such as Screencastify, YouTube, and PDF readings to support my instruction. Zoom is great for mature students, however, I quickly learned, a group of grade 5 students has even less of an attention span on Zoom than they do in the classroom! Creating videos of myself teaching short lessons helped tremendously as the students could then go and review it at their own time! Luckily, before I went online with this class our admin had us all prepare and teach the students how to navigate these different platforms which was a life saver as the students had already completed assignments and submitted them through Google Classroom! Jumping to present teaching, the fear of popping back to online learning has settled, however, after using platforms such as Google Classroom I now have an immense appreciation for them. I find they tie the break between home and school well and support students to get caught up on school work if they are away from the classroom. In the afternoons I teach Grade 5/6 science and Grade 6 Career Education, I continue to use Google Classroom to support my teaching as it allows me to post all the assignments that we are working on and the students can easily access the information and resources from their homes when needed! As for my Pre-Kindergartens, I use Edsby as a communication and family engagement tool. This is not as much units and lessons, however I often post different activities that the families can go and try! This is a great way to include families in the learning of their young children! Moving forward, I want to continue using these online platforms to bridge the gap between school and home and create an easy way for students to have access to their school work as we know our lives are busy and so are the families lives that we work with. I am hoping through this course I gain more resources and tools to better provided more interactive lessons to offer in the classes that I teach!

Here is an example video I made while teaching online: